Preface
The network video recorder (NVR) market is dominated by big names like Hikvision and Lorex. While these brands offer established solutions, they often feel dated in terms of both capabilities and hardware specifications. I recently set up a Hikvision NVR for my parents, and I couldn't help but notice the stark contrast between its limitations and the advanced features I enjoyed with my own Frigate NVR setup. The Hikvision system felt clunky and offered very basic motion detection, leading to a constant stream of irrelevant alerts. It lacked the intelligent object recognition that makes Frigate so valuable.
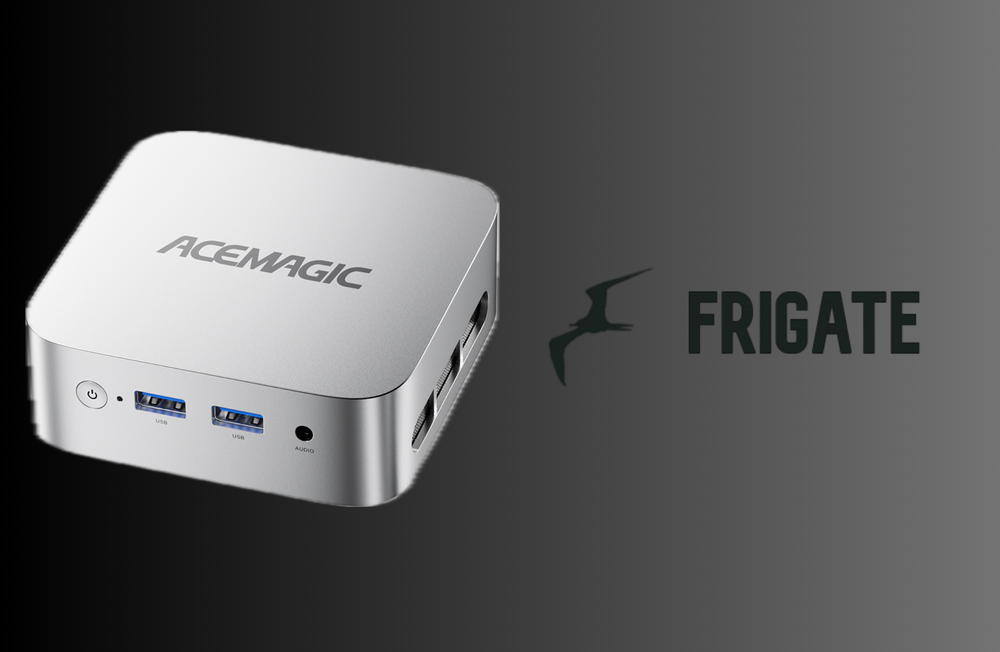
That's why I was intrigued when AceMagic reached out to me about their new V1 Vista mini PC, powered by an Intel Twin Lake N150. It struck me as a fantastic opportunity to modernize my parents' surveillance system and bring them into the world of AI-powered detection. I envisioned replacing their older NVR with a setup running Frigate, an open-source NVR solution known for its powerful object detection and customizable alerts. The V1 Vista seemed like the perfect platform for this upgrade due to its efficiency and unmatched encoding/decoding capabilities powered by Intel QuickSync. I believed I could transform this mini PC into a smart, efficient, and privacy-respecting NVR that offered a significantly better experience than traditional, closed-source systems. This project will aim to migrate their old system into a modern, AI-based detection NVR solution.
The AceMagic V1 Vista: Hardware Overview
The AceMagic V1 Vista is a palm-sized Mini PC powered by the Intel Twin Lake N150 processor. The Intel N150 is an evolution of the popular N100 processor, featuring increased clock speeds for both the CPU and integrated GPU. Intel claims it can boost up to 3.6 GHz, and the iGPU can reach up to 1 GHz, representing a 200 MHz and 250 MHz increase compared to the N100. The N150 maintains the four efficient cores without hyperthreading, and the 24EU iGPU is unchanged from the N100 (though it has eight more EUs than the N95).

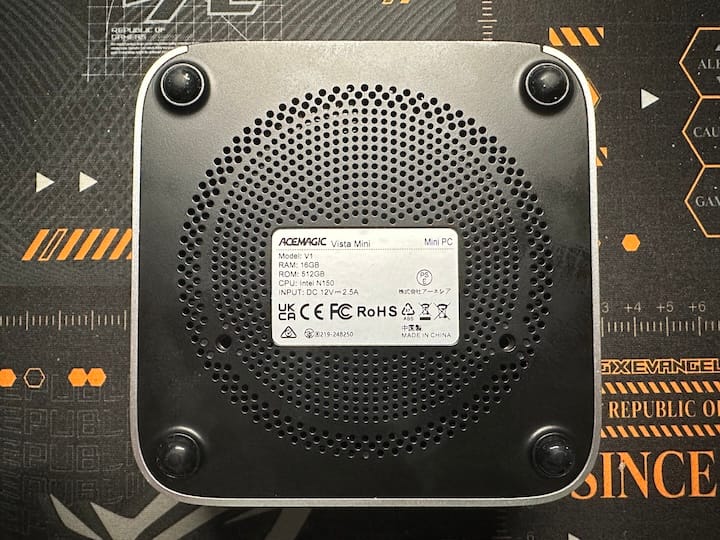
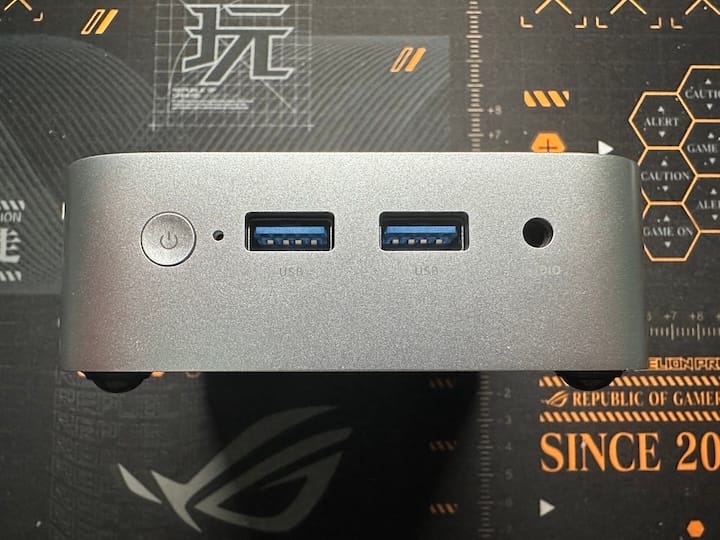
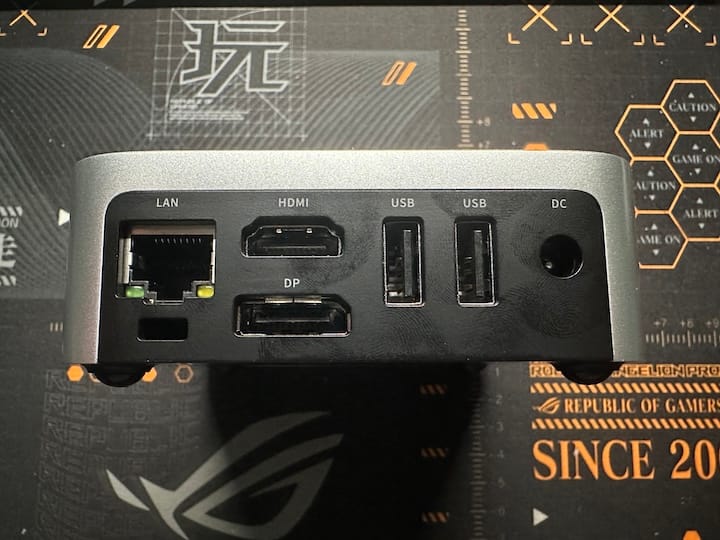
The system AceMagic sent is equipped with 16GB of DDR4 RAM running at 2666 MT/s and a 512GB no-name SATA M.2 SSD. For connectivity, it features two USB 3.0 ports on the front, along with a 3.5mm combo audio jack. On the rear panel, you'll find an HDMI port, a DisplayPort (DP), two USB 2.0 Type-A ports, and a Gigabit Ethernet port. It also includes WiFi 5 powered by a Realtek 8821CE chipset, although I won't be utilizing the WiFi in this guide. The unit is powered by a 30W power adapter.
In terms of performance, it is consistent with other N100-based systems. In Geekbench 6, it scored a Single-Core Score of 1292 and a Multi-Core Score of 2615.
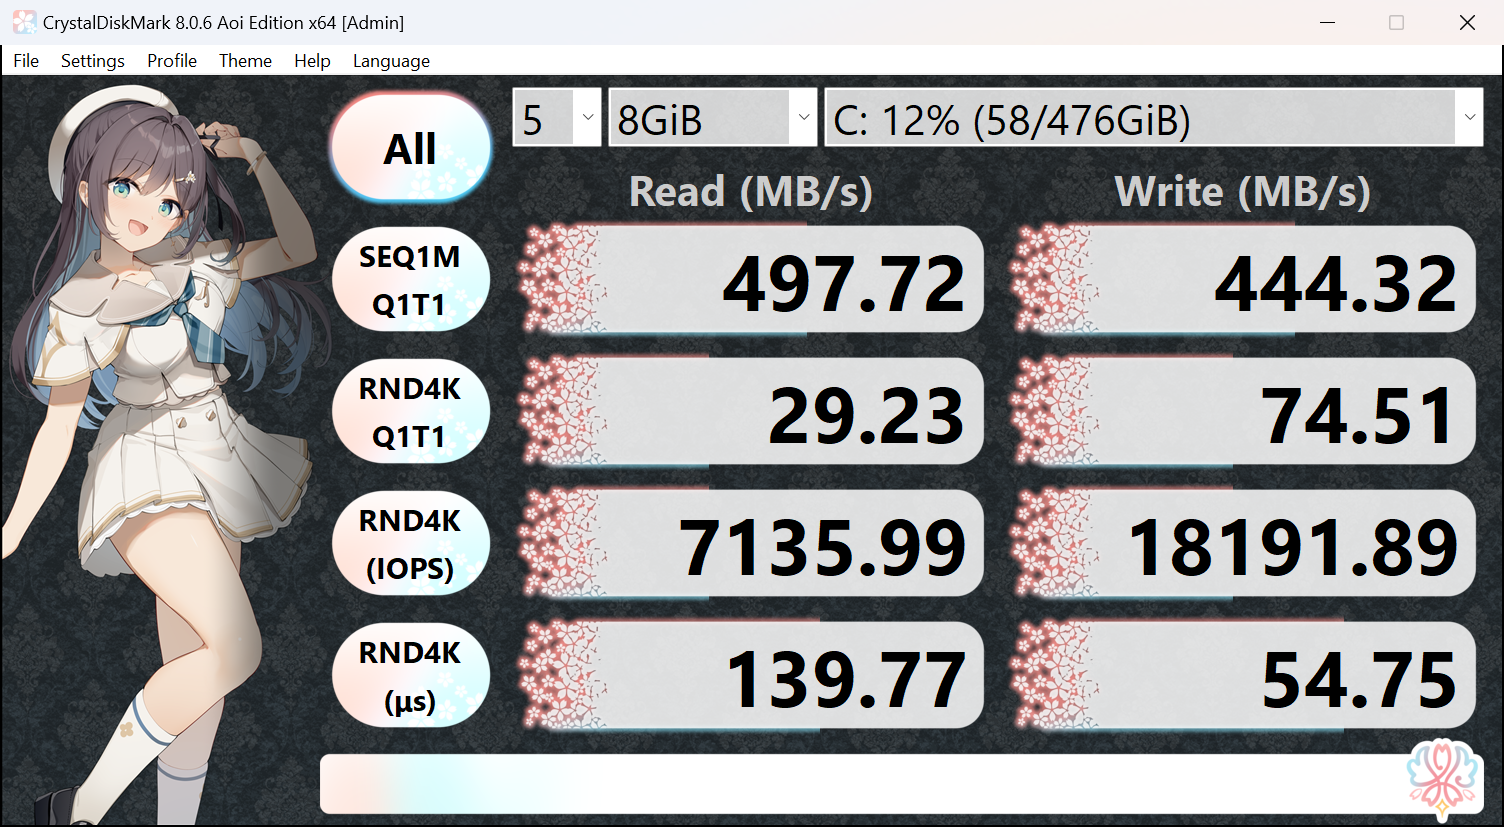
The factory-installed M.2 SATA SSD is lacking in performance with abysmal random 4K IOPS and R/W bandwidth.
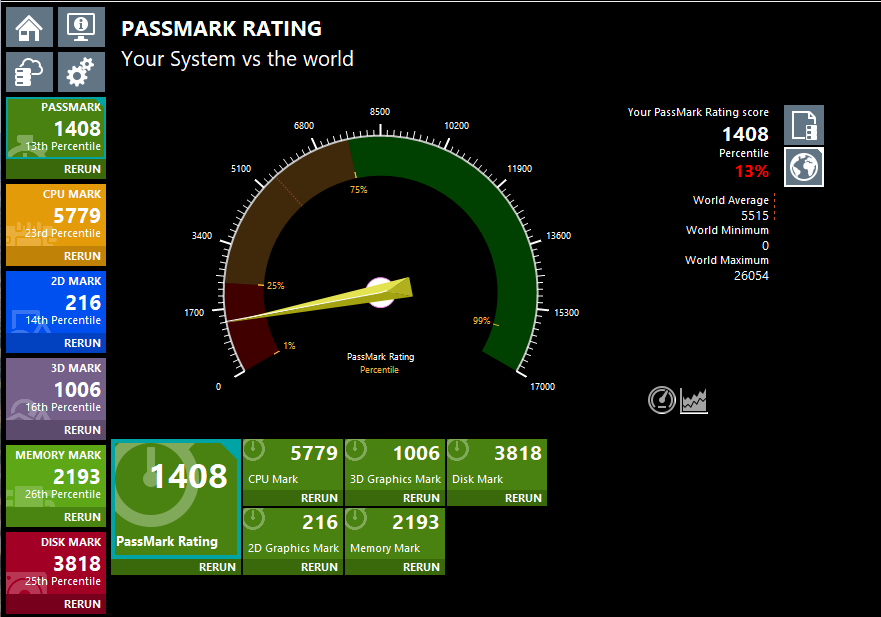
PassMark rated the system for 1408 points, ranking the 13th percentile across the database.
Here are some comparisons in AIDA64:
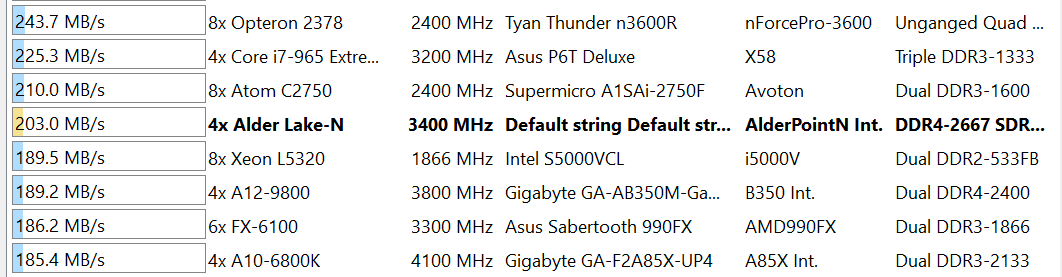
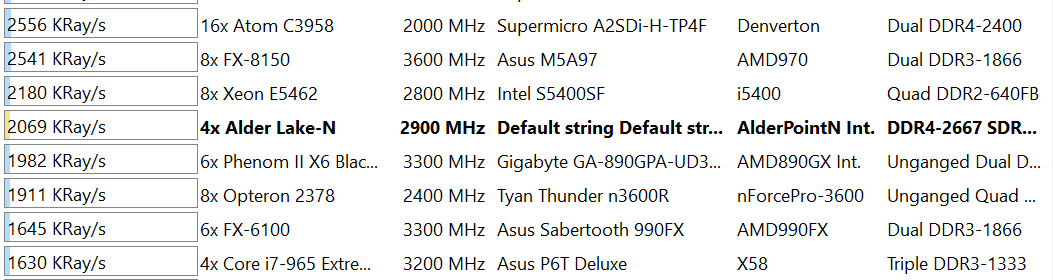
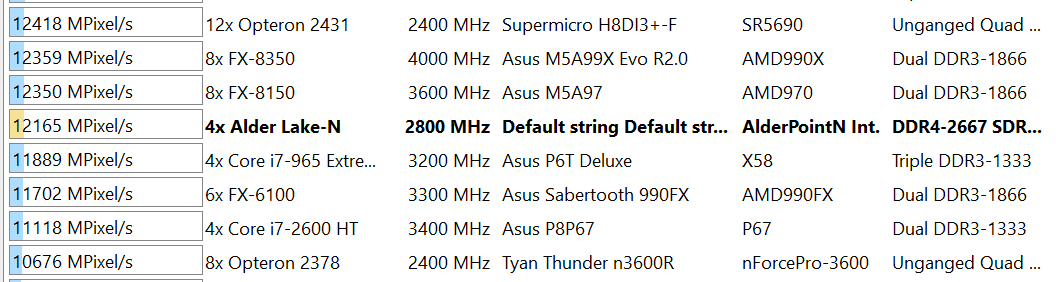
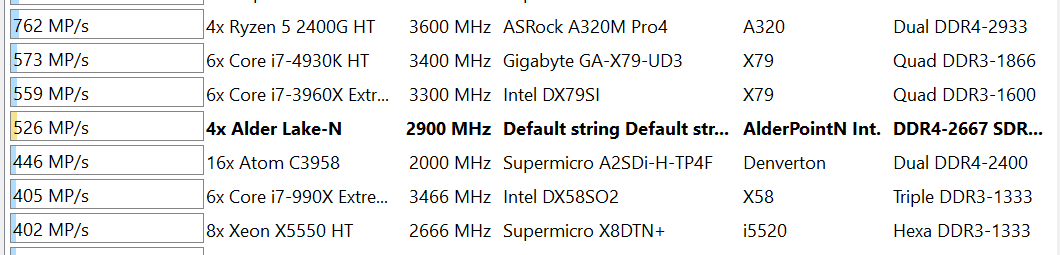
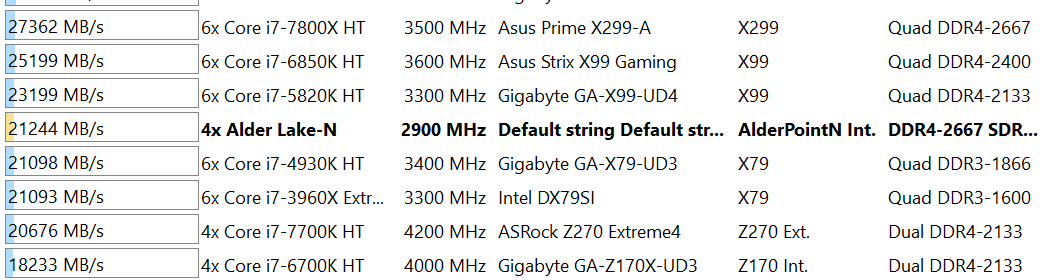
As we can see, this system is not going to win any benchmark champions. It even falls behind some X99 relics.
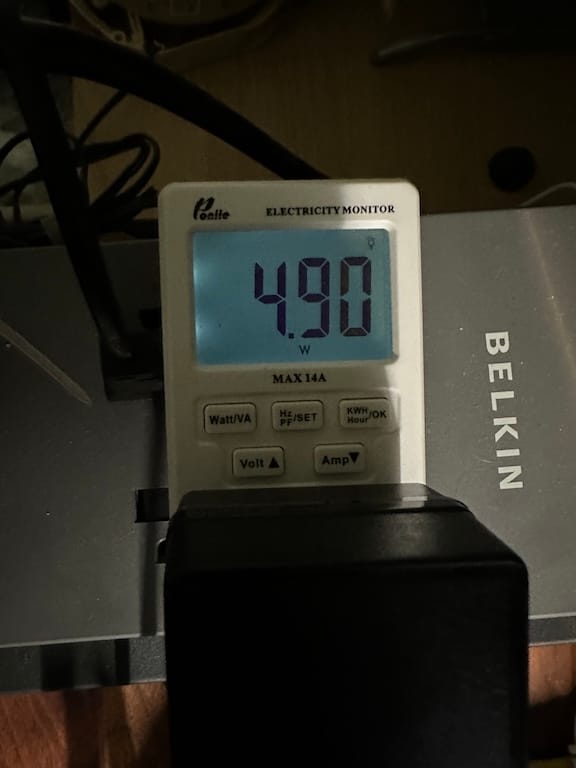
But what’s really crazy is the power efficiency. I observed the idle power draw at the wall consistently below 8W, sometimes as low as 5W while running Proxmox.
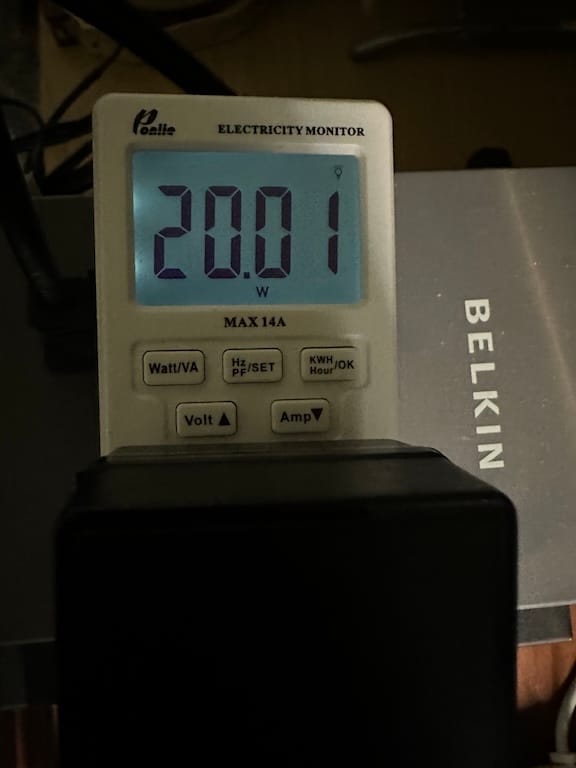
When at load running Geekbench and PassMark, this system pulls about 20W. I confirmed the PL1 and PL2 are both set to 15W in the BIOS. 20W N150 vs 200W X99 Xeons? I’ll take the N150 any day. Also worth noting: it is very quiet through out the testing process. I can’t hear the fan sitting less than 20 inches away.
Installing Proxmox VE and Setup iGPU SRIOV
The Proxmox VE installation process is relatively straightforward. Download the Proxmox ISO from the official website, create a bootable USB drive using Rufus or BalenaEtcher, and boot your AceMagic V1 Vista from the USB drive. Follow the on-screen prompts to complete the installation, paying close attention to the network configuration. It is highly recommended to assign a static IP address to your Proxmox server for consistent access. For detailed instructions, refer to the Official Proxmox Installation Guide.
After installing Proxmox, you'll want to enable iGPU SR-IOV (Single Root Input/Output Virtualization). This allows you to create virtual functions (VFs) of the integrated GPU and pass them directly to your virtual machines (VMs) or containers. Enabling iGPU SR-IOV provides significant benefits for Frigate by allowing it to directly access the GPU for hardware-accelerated video processing, while sharing the iGPU with other applications such as a media server, or a transcoding VM.
For detailed steps on enabling iGPU SR-IOV, please refer to my guide. The configuration for LXC will be detailed in the next section.
Installing Docker
To run Frigate, we need to install Docker. There are two main approaches for setting up a Docker environment in Proxmox. The first is the traditional method of creating a virtual machine (VM) and installing Docker within it. The second, which we'll use in this guide, is to create an LXC container and install Docker inside. LXC offers several advantages: it's lightweight, easy to manage and troubleshoot, and snapshots are invaluable when fine-tuning configurations.
We'll use a Proxmox Community Script to create a Docker LXC. Head over to the Proxmox Docker LXC Script page. When prompted to select setup settings, choose "Advanced Settings" for greater control over the process:
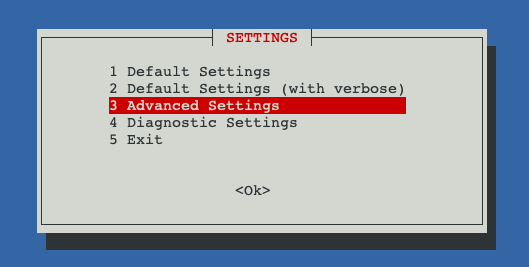
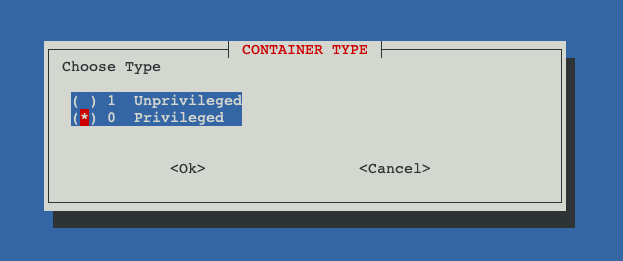
In the “Distribution” menu, we will use “debian 12”. Then, use “Priviledged” as the container type.
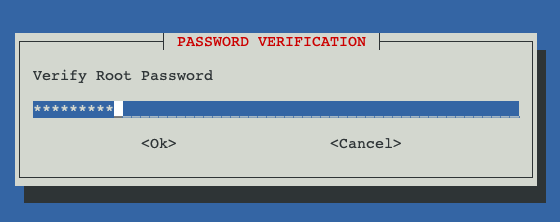
Set a root password:
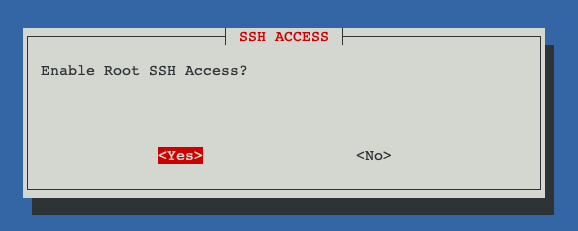
I'll allocate 20GB of disk space, 3 CPU cores, and 4096 MB of RAM. When asked if you want to enable Root SSH access, you can enable it now for setting up Frigate and disable it later for security. I'll enable mine for the guide for easier config file editing.
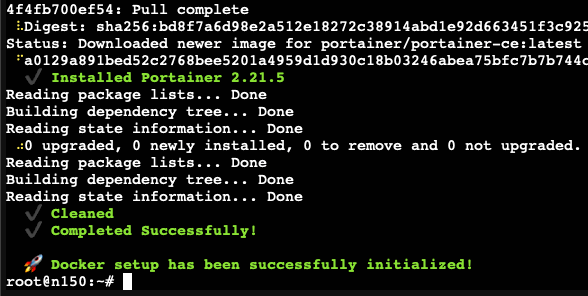
Follow the remaining prompts to create the LXC. After creation, you can log in using the Proxmox console with the username root and the password you set. Alternatively, you can use the SSH key if you enabled SSH root access. When the setup completes, you'll be asked if you want to install Portainer. I find Portainer extremely helpful for managing Docker containers, so I recommend installing it. If you choose not to use Portainer, be prepared to manage Docker using command-line tools.
Now that the Docker LXC is running, let's configure SRIOV for the iGPU.
iGPU SRIOV Setup:
The detailed steps can be found here in my blog. I would only detail the LXC configuration here.
To start, shut down the Docker LXC if haven’t already. Then, edit the configuration file of the LXC by:
nano /etc/pve/lxc/{LXC_ID}.conf
These are the lines that we would have to change, delete and add. In this configuration file, we will be mapping the virtual function card1 and renderD129 to card0 and renderD128 inside the LXC, with making the host device path 226:1 and 226:129 accessible by the LXC.
lxc.cgroup2.devices.allow: a  ##DELETE
lxc.cap.drop:  ##DELETE
lxc.cgroup2.devices.allow: c 226:1 rwm #CHANGE
lxc.cgroup2.devices.allow: c 226:129 rwm #CHANGE
lxc.mount.entry: /dev/serial/by-id  dev/serial/by-id  none bind,optional,create=dir  ##DELETE
lxc.mount.entry: /dev/ttyUSB0       dev/ttyUSB0       none bind,optional,create=file ##DELETE
lxc.mount.entry: /dev/ttyUSB1       dev/ttyUSB1       none bind,optional,create=file ##DELETE
lxc.mount.entry: /dev/ttyACM0       dev/ttyACM0       none bind,optional,create=file ##DELETE
lxc.mount.entry: /dev/ttyACM1       dev/ttyACM1       none bind,optional,create=file ##DELETE
lxc.mount.entry: /dev/dri/card1 dev/dri/card0 none bind,optional,create=file #ADD
lxc.mount.entry: /dev/dri/renderD129 dev/dri/renderD128 none bind,optional,create=file #ADD
Here’s a complete configuration file for your reference:
arch: amd64
cores: 3
features: nesting=1
hostname: docker-lxc
memory: 4096
net0: name=eth0,bridge=vmbr0,hwaddr=BC:24:11:89:8E:36,ip=dhcp,type=veth
onboot: 1
ostype: ubuntu
rootfs: local-btrfs:100/vm-100-disk-0.raw,size=20G
swap: 512
tags: community-script;docker
lxc.cgroup2.devices.allow: c 226:1 rwm
lxc.cgroup2.devices.allow: c 226:129 rwm
lxc.mount.entry: /dev/dri/card1 dev/dri/card0 none bind,optional,create=file
lxc.mount.entry: /dev/dri/renderD129 dev/dri/renderD128 none bind,optional,create=file
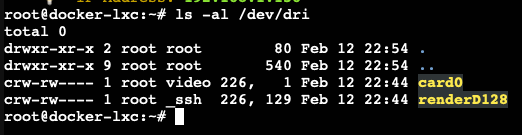
Now go into the LXC console and verify our VF has been passed to the LXC:
ls -al /dev/dri
The output should have both card0 and renderD128 like so.
We are now ready to setup Portainer and Frigate.
Set Up Portainer and Frigate:
Portainer is a web-based interface that simplifies the management of Docker containers. Think of it as a visual control panel for Docker, making it much easier to deploy, manage, and monitor your containers. The Portainer Admin Panel is accessible on port 9443 of your LXC's IP address:
https://{YOUR_LXC_IP}:9443
Go to the address to set up an admin user.
Next, we'll create a few folders inside the Docker LXC for Frigate to use. These folders will serve as storage for configuration files and recorded media:
mkdir /opt/frigate
mkdir /opt/frigate/config  # For Frigate's configuration file (config.yml)
mkdir /media/frigate  # Where Frigate will store your recorded video footage (IMPORTANT: This will be an external mount later!)
Now, let's create Frigate's configuration file, config.yml. This file is where you define your cameras, object detection settings, and other parameters. I'll explain some important settings. Here's a sample configuration file taken from my working instance:
mqtt:
  host: {HOME_ASSITANT_IP:MQTT_PORT}
  user: {USER}
  password: {PASSWORD}
  # enabled: False # If not using MQTT for Home Assistant integration
cameras:
  Front_Door:  # DIRECT STREAM
    ffmpeg:
      hwaccel_args: preset-vaapi # Use Intel Quick Sync Video for hardware acceleration
      inputs:
        - path: rtsp://{RTSP_IP_ADDRESS} # Replace with your camera's RTSP URL
          input_args: preset-rtsp-restream
          roles:
            - record # This stream will be used for recording
    detect:
      height: 360 # Lower resolution for faster object detection
      width: 640
      fps: 5
  Backyard:  # go2RTC RESTREAM
    ffmpeg:
      hwaccel_args: preset-vaapi
      inputs:  ## TWO STREAMS, LOWRES FOR DECT, HIRES FOR REC
        - path: rtsp://127.0.0.1:8554/Backyard_Record # High-resolution stream for recording
          input_args: preset-rtsp-restream
          roles:
            - record
        - path: rtsp://127.0.0.1:8554/Backyard_Detect # Low-resolution stream for object detection
          input_args: preset-rtsp-restream
          roles:
            - detect
  Stairs:
    ffmpeg:
      hwaccel_args: preset-vaapi
      inputs:
        - path: rtsp://127.0.0.1:8554/Stairs_Record
          input_args: preset-rtsp-restream
          roles:
            - record
        - path: rtsp://127.0.0.1:8554/Stairs_Detect
          input_args: preset-rtsp-restream
          roles:
            - detect
  Great_Room:
    ffmpeg:
      hwaccel_args: preset-vaapi
      inputs:
        - path: rtsp://127.0.0.1:8554/Great_Room_Record
          input_args: preset-rtsp-restream
          roles:
            - record
        - path: rtsp://127.0.0.1:8554/Great_Room_Detect
          input_args: preset-rtsp-restream
          roles:
            - detect
detectors:
  ov:
    type: openvino
    device: GPU

model:
  width: 300
  height: 300
  input_tensor: nhwc
  input_pixel_format: bgr
  path: /openvino-model/ssdlite_mobilenet_v2.xml
  labelmap_path: /openvino-model/coco_91cl_bkgr.txt
version: 0.15-1
camera_groups:
  Home:
    order: 1
    icon: LuAirplay
    cameras:
      - Front_Door
      - Great_Room
      - Stairs
      - Backyard
go2rtc:
  ffmpeg:
    bin: ffmpeg
  streams:  ## STREAMS FOR RESTREAM, REDUCING CONNECTION
    Backyard_Detect:
      - rtsp://{ENDPOINT_FOR_LOW_RES_STREAM}
      - ffmpeg:backyard_detect#audio=opus
    Backyard_Record:
      - rtsp://{ENDPOINT_FOR_HIGH_RES_STREAM}
      - ffmpeg:backyard_record#audio=opus
    Stairs_Detect:
      - rtsp://{ENDPOINT_FOR_LOW_RES_STREAM}
      - ffmpeg:stairs_detect#audio=opus
    Stairs_Record:
      - rtsp://{ENDPOINT_FOR_HIGH_RES_STREAM}
      - ffmpeg:stairs_record#audio=opus
    Great_Room_Detect:
      - rtsp://{ENDPOINT_FOR_LOW_RES_STREAM}
      - ffmpeg:great_room_detect#audio=opus
    Great_Room_Record:
      - rtsp://{ENDPOINT_FOR_HIGH_RES_STREAM}
      - ffmpeg:great_room_record#audio=opus
record:
  enabled: true
  retain:
    days: 30
    mode: all
  alerts:
    retain:
      days: 60
  detections:
    retain:
      days: 60
objects:
  track:
    - person
    - car
    - cat
    - dog
    - bus
Explanation:
- Placeholders: I've added placeholders like
YOUR_LXC_IP,RTSP_IP_ADDRESS,HOME_ASSISTANT_IP. - Comments: I've added comments to explain the purpose of each section and key settings.
- Hardware Acceleration: I've emphasized the
hwaccelargs: preset-vaapi setting and explained that it's using Intel Quick Sync Video for hardware acceleration. go2rtc: It is a tool that allows re-streaming, reduces the load to the cameras- Mounts: The model section tells Frigate to use OpenVINO for the AI processing.
After setting up the cameras in go2rtc section, you can refer to them by their names in the cameras section. You can also assign roles to use the low resolution stream as the detection stream, and high resolution stream as the recording stream. If your camera only has one stream, it is recommended to set the detection resolution to something lower than the native res, such as 640x360. The detector is the single most resource-intensive component of Frigate - you won’t get far with detections running at 1080p and 30 fps. For a mini PC, the N150 can handle 360p detection without breaking a sweat, thanks to its 24EU iGPU and Intel’s OpenVINO technology.
You may also change the parameters in the record section. Remember we assigned just 20GB of disk space for Frigate? That’s just for the LXC. For camera footage, you’ll need to use an external mount. It can be a NAS or even a separate volume in your Proxmox instance mounted to the /media/frigate directory.
Save this file to /opt/frigate/config/config.yml. Next, we will work on the docker-compose.yml file for the Frigate container. Let’s head to Portainer and set up the yml file over there.
Inside Portainer, select “Stacks” from the left navbar. Click “Add Stack” on the top right, name the stack something like “frigate”, and we can use the Web Editor to create the docker-compose file. Here’s a sample from Frigate Official Docs, but I made some changes to work with our setup:
services:
  frigate:
    container_name: frigate
    privileged: true # this may not be necessary for all setups
    restart: unless-stopped
    stop_grace_period: 30s # allow enough time to shut down the various services
    image: ghcr.io/blakeblackshear/frigate:stable
    shm_size: "512mb" # GOOD Est: 64MB per Camera
    devices:
      - /dev/dri/card0:/dev/dri/card0 # Passes the VF
      - /dev/dri/renderD128:/dev/dri/renderD128 # For intel hwaccel
    volumes:
      - /etc/localtime:/etc/localtime:ro
      - /opt/frigate/config:/config ## Folders we made
      - /media/frigate:/media/frigate  ## Folders we made
      - type: tmpfs # Optional: 1GB of memory, reduces SSD/SD Card wear
        target: /tmp/cache
        tmpfs:
          size: 1000000000
    ports:
      - "8971:8971"
      - "5000:5000" # Internal unauthenticated access. Expose carefully.
      - "8554:8554" # RTSP feeds
      - "8555:8555/tcp" # WebRTC over tcp
      - "8555:8555/udp" # WebRTC over udp
    #environment:
      #FRIGATE_RTSP_PASSWORD: "password" # CHANGE THIS. Needed if your cameras require authentication for RTSP streams.
Finally, scroll down the page, click “Deploy the stack” to pull the image and run the Frigate container!
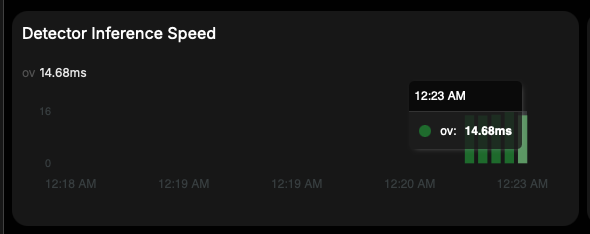
If everything goes according to plan, you should be able to see Frigate up and running! On this N150-based mini PC, the inference speed is surprisingly good at ~15ms.

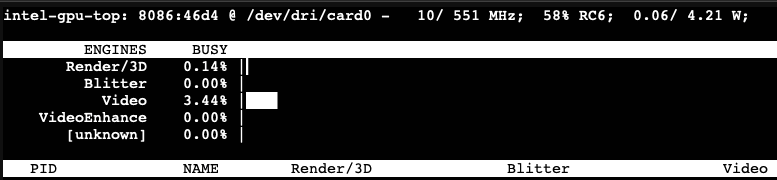
If you want to monitor the iGPU usage, install intel-gpu-tools on the Proxmox host, then run:
intel_gpu_top -d sriov
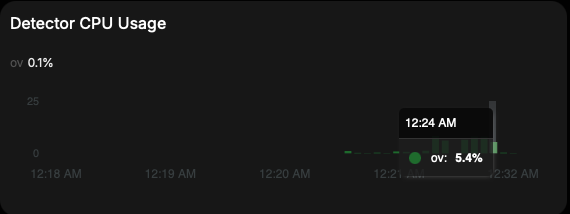
As you can see, it is using minimal resources to handle the camera streams:
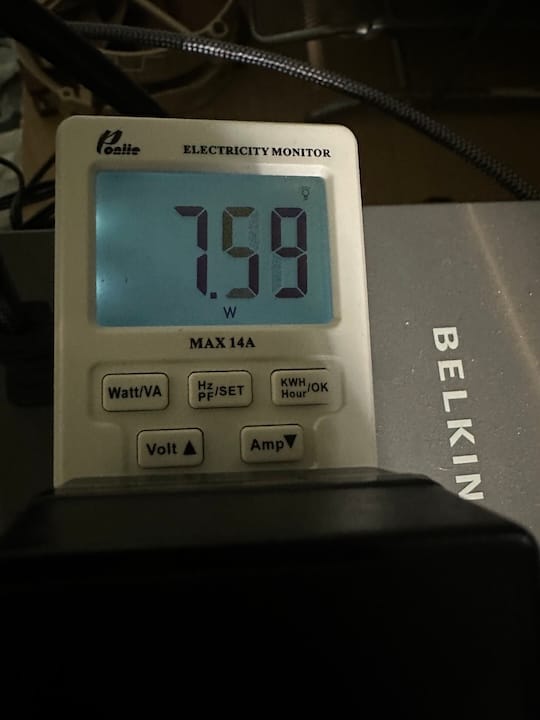
The best part is - The AceMagic V1 Vista does all this while drawing <8W from the wall.
A Few More Words
Congratulations! You've successfully configured a Frigate NVR running inside a Docker LXC on your AceMagic V1 Vista. While this guide covered the core steps, there are many more possibilities to explore.
Remember that we allocated just 20GB of disk space for Frigate? That’s just for the LXC. For camera footage, you’ll need to use an external mount. It can be a NAS, or even a separate volume in your Proxmox instance mounted to the /media/frigate directory.
Before you go further, take a snapshot of your LXC in Proxmox. This allows you to easily revert to a working state if you make any mistakes while experimenting with advanced settings.
Now, you can experiment with other awesome integrations to Frigate such as the Home Assistant MQTT integration, which provides rich features for smart home. Additionally, you can also run Home Assistant with Proxmox, too!
Price and Availability
If you are interested in this product, it is currently selling for $158 ($169 - $11 Coupon) on Amazon. In addition, you can use our exclusive promo code R2FDIHCM to take another 10% off from the original price, which brings the whole unit to $141.10.