In the last blog post, I mentioned that alongside with the M.2 HBA, I’ve also ordered a dual port 2.5Gbe NIC from IOCREST. In this blog post, I will be reviewing this unit, and set it up in Proxmox for my Unraid and TrueNAS Scale VMs.
Introduction
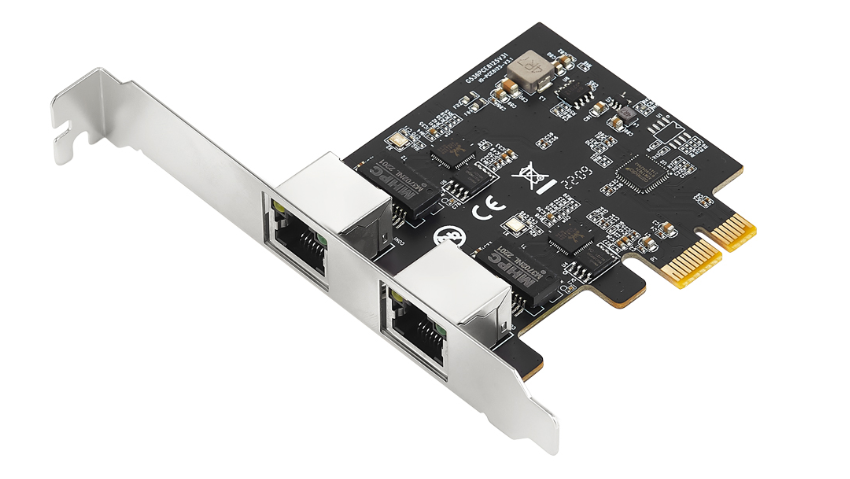
This dual port 2.5Gbe NIC from IOCREST features two Realtek 8125B chip for dual port operation. It uses PCIe 2.0 x1, so the bandwidth is just about enough for a total of 5Gbps of data transfer.
The card design is relatively simple. It has a PCIe switch chip to handle the aggregate IO for the two RTL8125B chip. I’ve also noticed the lack of heatsink on this card. However, I don’t believe it needs one since the chip is so small that I can’t even get a good picture of it.

Getting it into the system is easy enough. My motherboard has a PCIe 3.0 x1 slot in the form factor of x16, which I was using it for a Mellanox ConnectX-3 10Gbe NIC. I pulled the Mellanox out and got this IOCREST NIC installed. Furthermore, IOCREST also included a low-profile bracket for other form factor applications.
Upon powering up the system, Proxmox recognized the NIC without any problem. A quick lspci command shows two of the Realtek 8125B chips as PCIe devices.

Setup Realtek 8125B 2.5G NIC in Proxmox for Unraid and TrueNAS Scale VMs
Updating the Driver
Although Linux provides official driver support for this NIC, it is best to use the new and updated r8125 kernel module instead of the official r8169.
First, we will need to install build tools and Proxmox headers:
apt install build-essential
apt install pve-headers-$(uname –r)
NOTE: I am using Proxmox 7.1 with kernel version 5.15.39-4.
Then, go to this webpage for official Realtek drivers. Scroll down to the Linux section, you can see that driver version 9.009.02 was updated on 2022/07/08, and it supports Linux kernel up to 5.19. Click on the link, follow the instruction, and download the tarball package.
Once downloaded, you can upload this tarball to your Proxmox server with your favorite SFTP tool. On MacOS, I like the app “Forklift” from Setapp.
After you’ve uploaded the file, use the following command to untar this file:
tar -xvf r8125-9.009.02.tar.bz2
Then you will see a untarred folder, having the same name as the file. A little trick - you don’t need to type the whole file name, just type “r” and then press “Tab”, bash will finish the file name for you.
Go into the untapped folder:
cd r8125-9.009.02/
You will see the following files:

Make the autorun.sh executable:
chmod +x autorun.sh
Finally, run autorun.sh to install the driver.
After the installation, run the following command to see if the new driver is loaded:
lsmod | grep r8125
If you see an output that’s similar like this, the driver is correctly installed, and the NIC is ready to use.

Setup in Proxmox
In this part, we will setup this NIC for a Linux Bridge, that way we can use it in all VMs as a paravirtualized NIC. You can also pass this NIC as a whole to one of the VMs, you can’t pass them separately although they appear in Proxmox as two separate devices. In my case, TrueNAS Scale doesn’t have the driver for this NIC, even if it has added support, it is unlikely that they will use the newest driver from Realtek. So, I will be using it as a paravirtualized NIC.
In Proxmox, go to your node, and select “System - Network”:

As you can see, I have quite a few NICs. The ones belong to the IOCREST is enp6s0 and enp7s0. Identify the port that you are going to be using, make note of that in your mind since we will need it later.
With that said, click on “Create” and select “Linux Bridge”.

In the pop-up window, you only have to give it an easily recognizable name, and the bridge port. In my case, I gave it a name of vmbr1 since I am lazy, then assigned enp7s0 to this bridge.

When you are done with the above, click on "OK", then click on "Apply Configuration". Proxmox will take the network down to apply the change.
This bridge should be up and running now. Just like the default bridge vmbr0, we can use paravirtualized NIC in Proxmox with this bridge and get 2.5Gbe speeds regardless if the guest VM has the driver for the physical NIC.
To change which bridge a paravirtualized NIC uses, we can simply going to “VM - Hardware’. Then, click on “Network Device”, and click on “Edit” on the top of the page. You can select the bridge in the drop down menu.
In this case, I will use vmbr1

Validation
I will be running a short iperf3 test in the TrueNAS Scale shell.
Within TrueNAS shell:
iperf3 -s
Then on my Mac:
iperf3 -c [server_IP] -V -t 30

Reversed mode (downloading from TrueNAS):
iperf3 -c [server_IP] -RV -t 30

BlackMagic Disk Speed Test:
First I ran this on my mirrored MX500 500GB pool:

For the sake of this test, I also ran this on my 8-disk Z1 pool, striped with 2 vdevs:

The results are pretty consistent.
Conclusion
Based on the results, I’d say this NIC works as I expected it to. The setup is very straightforward, and it seems to be reliable as well.